
Kaltura is a video hosting platform.
Hosted at UBC, you or your students can upload, share or record videos inside Canvas. It can be used in many places throughout a course, and videos can be used in multiple courses.
What is this tool for? | How do I get started? | Example Use Cases | Additional Resources | Similar Tools | Support Available
What is this tool for?
Fully integrated with Canvas, Kaltura allows you to upload, record and organize manage videos to share and reuse in your courses. Videos can be added anywhere in Canvas with a content editor, including Course Content, Discussion Forums, Announcements and Assignments! Students can also add videos, creating interesting possibilities such as asynchronous video discussion boards.
Highlights
- Kaltura has unlimited data storage, so you can upload your lectures and other media and keep it secure.
- Kaltura Capture supports screencast recording, so you can record your webcam and your screen at the same time (i.e. powerpoint slides)
- Kaltura supports captioning for accessibility. You can request automated captions and quickly fix mistakes.
How do I get started?
You will need to login using your Campus-Wide Login (CWL) into Canvas. You will need a Canvas course to access your My Media.
You can also log in to Kaltura outside of Canvas using the Teaching and Learning videos portal. The videos you upload and manage from this portal will still be accessible inside Canvas.
Follow these steps or watch this video for a guide on how to upload to My Media.
You can upload videos by accessing the My Media tab, which can be found in your Canvas course on the navigation bar on the left.
-
- Go to My Media within the Course Navigation menu.
- If you are unable to view the My Media tab:
- Go to Settings within the Course Navigation menu
- Select the Navigation tab
- Find the My Media menu item, click the cog icon, and choose "Enable"
- Choose Save to update the navigation menu
- If you are unable to view the My Media tab:
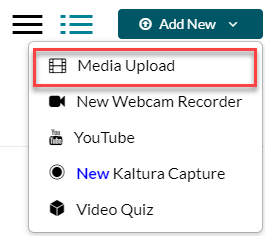
- Click Add New.
- Select Media Upload.
- Click Choose a file to upload.
- Select the file you wish to upload from the file manager.
- Select the proper permission from the Copyright Permissions drop-down menu (if it is a video you have created, you should select “With Permissions from the Copyright Holder”.
- Click Save.
- The media will be saved as private by default
- Go to My Media within the Course Navigation menu.
You can also create your own recording using Kaltura Capture.
For students of a course to see the media you have uploaded, you will have to publish it to a course.
You can embed your uploaded media in any pages, discussion, announcement or assignment on your Canvas course using the Rich Content Editor.
Example Use Cases
- Video Testimonial – Kaltura Overview (3:00)
- Thanks to BCcampus for funding our Web Content Accessibility and Accessible Media projects. The Faculty of Education has been committed to providing accessible course materials since 2005. All the videos we produce for online and blended courses are captioned and accompanied with transcripts.
- Video-based content is used in courses to provide students with a different type of engagement. MOOCs (Massive Open Online Courses) use videos as their main medium. Check out the Faculty of Education’s first MOOC on Reconciliation through Indigenous Education.
Additional Resources
- Kaltura FAQ
- Learn how to record a lecture from Canvas, with no standalone software required.
- LT Hub’s guide on starting to use Kaltura
- Enabling captions in Kaltura
Similar Tools
- Camtasia – for more advanced and powerful video editing
- Snagit – for screenshots and simple annotations
- UBC Studios – for studio quality lecture recordings or more large scale projects
- H5P – interactive multimedia content that are not videos
Support Available
Support for this tool is provided by Educational Technology Support.